Access the Ad-Free Version of this article at the Rock Seeker Club
How To Carve Stones With a Dremel
Using a Dremel to carve stones is both far easier and far tougher than I ever thought it would be. Over a decade ago my first attempt at the lapidary arts took place, carving stones with a Dremel. The internet has changed a lot since, back then the only gem carvers available were on half-dead lapidary forums and you usually had to overcome a language barrier as well.
Fortunately, these days it’s much easier to get advice from other carvers. If you want ot learn, you’re in the right place! Let’s get right to it and talk about carving stone with a rotary tool.
Is a Dremel the Right Tool?
Let’s be clear: a Dremel isn’t the best tool for this job. They’re a bit unwieldy, even high-end models have a bit of chatter, and you have to be very careful about working them wet. They’re still more than acceptable for use, particularly with carvings over a couple of centimeters in size.
You’re also far more likely to find a Dremel in the garage than a high-end flex shaft like a Foredom. A Dremel or other standard rotary tool will do the trick for the majority of carvings, especially if you invest in a flex shaft attachment.
Serious carving is always done wet. It’s more precise, keeps the stone cool, and keeps too much dust from going airborne.
There are countless Dremel models out there. Any of them will work, but to keep the tool itself from becoming a problem make sure that you pick a Dremel with variable speed. You’ll need lower RPMs than you use on materials like wood or steel in order to carve stone.
If I were to start today without my current toolset, I’d pick up the following items:
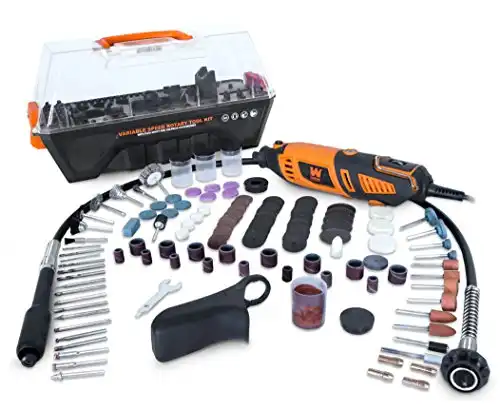
- Dremel 4000-4/34– Variable speed and a moderate price point make this a great model for carving stone. While the smaller stylus-style models are easier to use they also lack the torque required to bear down on the rock with any force, you’ll just stop the motor.
- Flex Shaft Attachment– If you want to just ignore all of the possible issues with electrical shock, then a flex shaft is the best tool you can buy. The Dremel brand ones are sturdy and a solid choice.
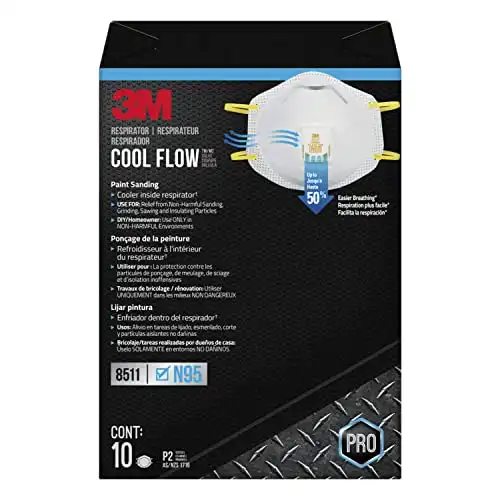
- N95 Masks– Always wear a mask when carving. I cannot impress this upon you enough, stone dust does damage that’s cumulative, and preventing it is very important.
Other than that, you’ll just need the correct bits and a bowl, cup, or dish to hold some water and your stone. I prefer broader bowls or Pyrex baking dishes depending on the task at hand, but you really just need room for one hand and the tool.


Finding Diamond Bits and Wheels
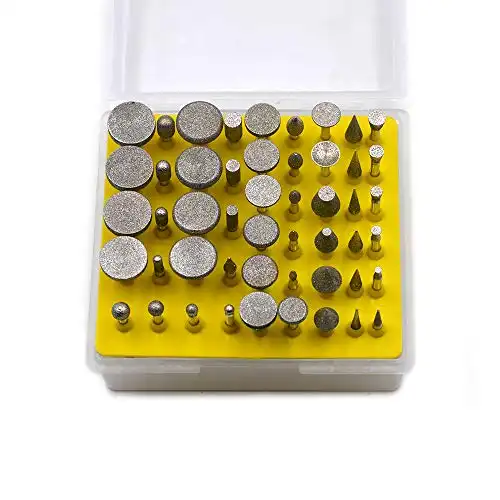
Diamond bits are disposable items. You should remember that when you’re selecting your bits. I’ve found that Dremel’s branded diamond bits last about 400% longer than the cheap ones. I can also buy, literally, a pack of 50 bits for the price of one Dremel-branded diamond bit.
You’re going to burn bits even faster when you’re learning.
For this reason, I always opt for the cheaper bits.
There are two reasons to go with high-end diamond bits:
- Extreme Precision- When fractions of a millimeter matter, it’s best to go with high-end bits. Dental bits are my preferred “high-end” tool and I’ll usually go through a dental supplier to get them since they aren’t readily available.
- Beryl and Corundum- Both of these stones are very hard and will eat through cheap bits like crazy. If you’re carving over 7.5 on the Moh’s scale in hardness it may be a good idea to go with branded or dental bits to avoid changing them out constantly.
For most of us, a generic pack is fine. I recommend the following:
- 50 Pack of Bits– This set has almost everything you need unless you’re planning on doing fine back-cutting of gemstones. I usually keep 2-3 sets in the shop and purchase finer bits separately. I prefer this set because grinding wheels are very handy but there are similar sets with more bits instead.
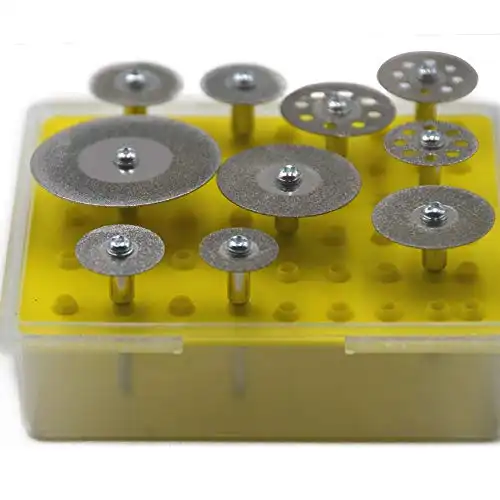
- 10 Piece Cutting Wheel Pack– Cutting wheels are a requirement if you don’t have a trim saw, and they’re nice to have even if you do. These are used to cut the stone down to a rough shape before carving further.
With these on hand, you’ll be able to carve most items without an issue.
Alternative Options
These days I use a Foredom LX for carving stone. This is a low-speed, high-torque flex shaft used by jewelers and engravers. They’re expensive but very precise and durable. The more common SR model can be used, but you’ll have to be careful with the pedal due to the higher RPMs of the motor.
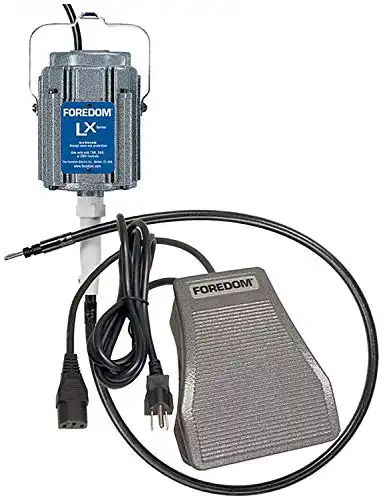
It’s not uncommon for the motor on mine to be running almost continuously for 3-4 hours at a time, which is another advantage. Most Dremels will be too hot to hold by the end of this.
Just make sure you have the right handpiece, the majority of Foredom handpieces are meant for 3/32” bits used for fine metal work. While you can find 3/32” diamond burrs, the vast majority are ⅛” and it will make your life much easier.
On the lower end of things, we have various brands of generic rotary tools. These work great. I’ve done complex 3D carvings with them in a pinch, and you can save a lot of cash by going down this route. I can’t attest to all of them personally, but I used the WEN 23190 as a starting point when I had to start my tool collection over.
That model, in particular, comes with a flex shaft and is cheaper than dirt. I ran mine into the ground, and it took about 400 hours of run time with zero maintenance before it even began to act iffy.
These cheaper ones do cut some corners. The WEN model I mentioned comes with brass collets, for instance, which will wear down quickly when working stone. Switch them out for steel collets and they’ll last much longer.
Supplemental Tools
You’ll also need a few other things to help with carving.
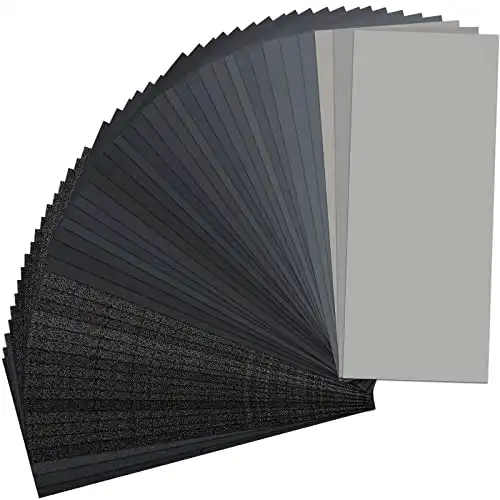
- Sandpaper– I buy these sets of sandpaper, this set specifically for stone since it runs up to 5000 grit. Get a wide range, you’ll develop favorites over time. For instance, I’ll usually run 400, 800, 1500, 2500, then 5,000 as a pre-polish. Others do it differently.
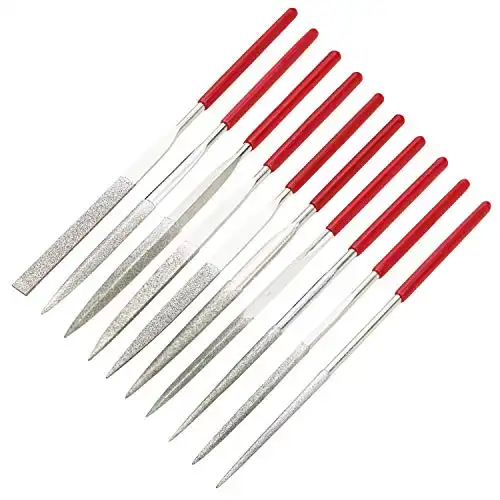
- Diamond Files– For minor corrections to the carving and to clean out undercut areas, nothing beats diamond files. A set of needle files is a great start, but if you continue working with stones you’ll eventually want a set of flat files and a set of riffler files.
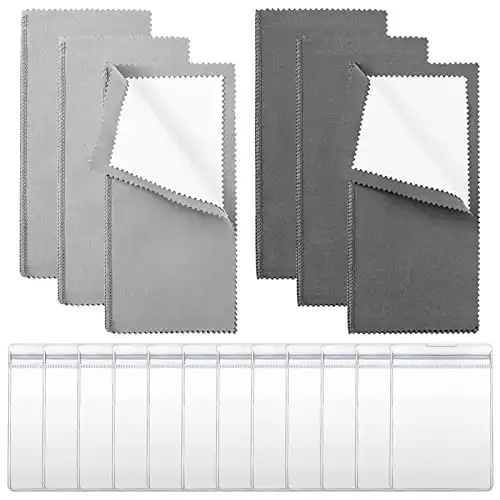
- Jeweler’s Cloth– I just use the old ones I have laying around the workshop, but buying a set is a great idea. These will clean the dust off your carving quickly and efficiently, allowing you to see your work more clearly.
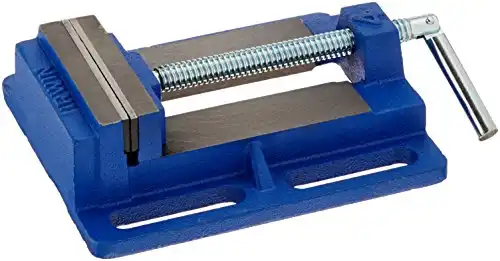
- Vise– I prefer a drill press vise just like the one linked. You can use it to hold the handpiece of your tool in place so you can work the stone around the grinding wheel or bit attached, instead of being forced to hold it at an awkward angle.
These are all optional, but they’re a big help further down the road.
Let’s Talk About Hazards
The biggest problem I’ve seen with carving is that some people come in without knowing about safety.
I know I did. There’s a reason I harp on about wearing a mask every time I write about lapidary work. While I avoided anything too permanent, it was a bit disconcerting.
The main hazard is silicosis. This is a progressive disease caused by the cumulative inhalation of silica dust over time. It kills you.
Not all rocks are silica, but the majority of stones we carve are.
Those that are commonly carved but aren’t silica-based such as calcite, fluorite, and malachite all contain their own hazards. Calcium affects the lungs in a similar manner, for instance, and malachite is even nastier than silica dust since it has copper salts which can cause neurological and intestinal problems.
Just wear a mask and work wet in a well-ventilated area.
Safety glasses should be worn as well, especially when cutting with wheels.
It’s not common, but at times chips can fly. Getting hit in the eye by one can do a lot of damage and glasses will prevent it. But a missing eyeball is still a better scenario than silicosis, so put on a mask when you’re working.
If you’re not using a flex shaft then you also need to worry about getting shocked or blowing a breaker when water drips down the line. Run a drip loop in this case, and don’t submerge the tool.
Basic Stone Carving Technique Introduction
Carving takes a long time to learn, and you can really only learn by doing in this case. You’ll eventually figure out which burrs work best, what kind of patterns they can make, and how to angle them to do what you want.
But there are a few things that you can learn before undertaking the task that will help you.
Material Choice
Material choice is your first real issue. Not all stones are suitable for carving, or rather for hardstone carvings. Limestone can be worked with a steel nail and patience, but agate is on a totally different level of hardness.
I prefer hard silica-based stones, agate and jasper being my favorite. There are other stones that may be easier for a new carver to try out as well.
The following can be bought online for new carvers and are all good for beginners:
- Common Opal- Softer than agate but capable of taking a great polish and fine detail. Madagascar green opal is very common, but it’s blast mined in many cases so you’ll need to keep an eye out for fractures.
- Calcite- All colors of crystalline calcite are great for carving ornamental pieces, but it’s too soft for wear.
- Fluorite- Another great stone to carve with. Fluorite works down well and can be found with color zoning for a low price.
- Quartz Varieties- Very hard, but great material for back-cut pieces like intaglios.
- Labradorite- Beautiful, softer than agate, and capable of taking a good polish. Labradorite is my favorite non-chalcedony stone for carving. Rainbow Moonstone also falls in this category.
- Obsidian- Beautiful stone that polishes incredibly well, just be aware that any scratches will quickly show and it can take time to get a perfect polish.
- Indigo Gabbro- A black and purple mottled igneous rock that can often be found cheap. The individual crystals have similar hardness and it works as one material without requiring a lot of finesse on your part.
The important thing is that the stone will hold together and take a polish. Everything else just details.
If you’re a beginner, stay away from corundum and beryl. They’re a pain to work, take an incredibly long time, and are rather expensive. If you insist then I recommend picking up a boule of corundum in the color you prefer and cutting that down.
Working Wet
We always want to work stone wet, which can be a bit inconvenient. You should still be wearing a mask when doing this.
This is why flex shafts are great. You can actually submerge them in water without worrying about the risk of shock, and it keeps particles from getting in the air.
If you’re running a normal Dremel without one, you should be careful to only submerge the bit itself.
The easiest setup is just to use a flat-bottomed Pyrex dish and lay it on a desk. I’ll often work off of my lap with a bowl as well, particularly when working with precious opal. Find a position you can hold for a long time, carving is slow work.
If you have a flex shaft then work submerged as often as possible. Applying a thin coat of oil after working and drying the tool thoroughly will keep it from rusting.
Cutting Down Rough
Cutting down rough stones is time-consuming, but we’ve got two methods that will save you a lot of time available.
Determine which part of the stone you need before you begin. I’ll sometimes grind off sharp corners before I decide. Make sure to look for fractures, since these will break farther down the line. There’s nothing quite as “fun” as having a piece with twelve hours of work behind it break in your hand because you missed a fault.
If you’re lucky, you’ll only make that mistake once.
The first way to cut them down is to use diamond cutting wheels. You can either cut the pieces clean off (if you have a big enough wheel) or you can cut in and remove notches. The latter method works well for larger stones, especially when combined with the second method.
The other method is to use a grinding wheel on your stone to wear away the bits you don’t want or need. This is easiest with a lapidary grinder, but you can also use your rotary tool.
Just lock either the flex shaft handpiece or the Dremel itself in a vise and move the stone to work it. You can make this faster for larger removal by cutting notches in with a cutting wheel and then grinding down the high points.
Run Low RPMs
It’s tempting to run your tool up to the max and see if you can’t make things go a little bit faster.
You can’t. You’ll just burn the diamond burrs out quicker and cause more heat generation. Most stones are sensitive to thermal shock, so you need to be careful about how hot things get if you pull it out of the water to work.
3,500-7,500 RPMs seem to work the best.
Some stones can take a bit more than others, but you want to keep things on the bottom end of the settings.
Use a Light Touch and Keep Moving
Likewise, don’t attempt to grind faster by pushing the bit into the stone harder. You need the mud to come out of the carved part, and pushing will keep it there.
Pushing down hard also generates heat and friction. These are the exact qualities that will kill your burrs faster.
If you’ve ever used a file it’s a similar concept. A light touch may not feel like it’s removing much material, but it will do so much quicker than bearing down on the stone.
You also want to keep the bit moving along the entire line. This will help dissipate heat and keep the bit from getting clogged.
When you’re doing things like drilling holes or removing material under a 3D sculpture you can kind of twirl the tool to keep things moving. Both of these tasks should be done submerged to avoid problems.
Sanding and Polishing
Sanding and polishing are just as time-consuming, and important, as the carving itself. When you first start out I recommend moving from grit to grit to get a feel for how each one works. Lower grits can be used for further shaping, but you won’t be able to do so after a certain point.
I consider 400 to be the last grit I’m actually shaping with.
Sanding inside textures and cuts is more problematic.
A pack of toothpicks can come in handy here, or even small dowels. Wrap the sandpaper around them and work them into the area that needs to be cleaned up.
Keep sanding on each grit until all of the scratches from the last grit are removed. All of them. You don’t want to get to the final polish and see that you’ve gouged your stone several times, it ruins the entire look.
Polishing is best done with a felt wheel on your Dremel or a grinder. Use small circles with your rotary tool or move the entire piece in a small circle if using a grinder.
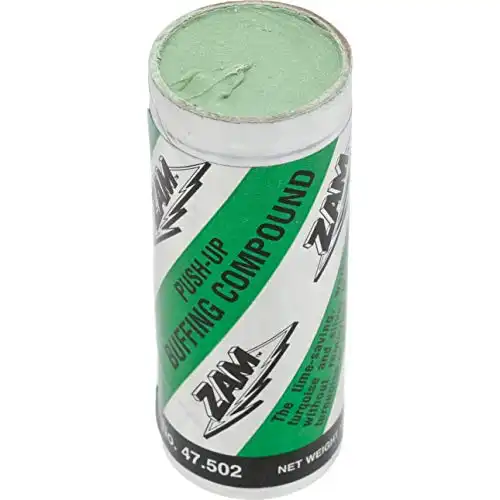
I’ve covered the subject in the past in more detail. That said, in general, I prepare cerium oxide paste for anything 6.5 on the Mohs or harder and a pre-prepared polishing compound called Zam on anything softer.
Learn the Bits and Burrs
I mainly use ball burrs when I’m carving, but there are many different types available. Each has its own use, some are specialized and some are more general use.
There is one thing I really wish I’d done when I started carving. Try taking your bits and running them wet on a spare slab or piece of rough with a good flat surface. Take each shape and make a line with it, moving quickly and maintaining only light pressure. You’ll be able to see the difference in how they work the stone more easily this way.
In general, area removal is best done with ball burrs of the appropriate size. Other shapes don’t quite fit the bill for just general removal, but they can be great for creating textures and lines.
It’s all a matter of preference, but testing them to start out is just the first step on your carving adventure. So give it a shot, you’ll be surprised at the results!
- Online rock and mineral club for collectors of all levels!
- Find community with like-minded rock and mineral enthusiasts.
- Monthly Giveaways!
- Free Access to Entire Digital Library of Products (current and future products)*
