If you’ve got a chunk of Leland Blue, or any other colorful slag glass, around then chances are you want to make it shine. Fortunately, it’s not too different from working natural stone, with just a couple of extra caveats.
So, read on for our guide on how to cut and polish blue slag!
What You Need
There’s a whole world of lapidary abrasives and tools out there. More than enough to leave a newbie confused.
I’ll be focusing on how to work with improvised tools, since few people have a cabbing machine sitting in their garage. You can still follow along, but with a cabbing machine you just need to run through the grits and polish.
I recommend getting a Dremel for this task. Grinding wheels work fine, but you’re unlikely to have a good grit gradient, need to watch the heat, and they’re a lot less safe for newbies.
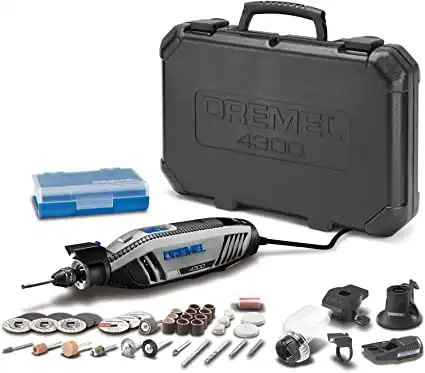
Premium rotary tool kit - Includes the 4300 Dremel rotary tool, 5 attachments, 40 high-quality Dremel accessories and plastic storage case.
Variable speed motor - 5,000 – 35,000 RPM with electronic feedback for consistent performance & accurate tool control
Pivot light - Rotates to illuminate your projects even in difficult to reach spaces
Replaceable brushes – Motor brushes can be replaced to extend tool life
You’ll need the following:
- Grinding Wheel or Rotary Bit- Rough and in the 80 to 120 range is best. A grinding wheel is faster but requires a lot more care. Rotary bits cut slow in comparison, but it’s easier to adjust to problems.
- Sanding Drums or Sand Paper- Ideally you’ll have small increments from 220 to 1500 or more. In practice, you can get away with 220, 400, 1000, and 1500 without needing the in-between grits. You’ll have to be more careful in that case, however, as fixing problems will take longer.
- Polishing Wheel or Rotary Bit- is where a wheel is best used, but the felt bits for a Dremel work fine with the right polishing compound.
- Cerium Oxide- My preferred polish for any material that’s 6.5 or over on the Moh’s scale. It usually comes as a fine powder.
- Water Tray- We want to work wet as much as possible. Something that holds water and is easily accessed during the work is essential.
That should cover you, especially if you’re mostly looking to just work the surface of the stone. If you’re planning on making a more intricate carving, you may want to find a set of diamond files. These will allow you to make lines, creases, and other surface carvings easier than a Dremel.
Diamond bits for the Dremel also work, but carving stone or glass is it’s own subject and beyond the scope of this article.
You also need a respirator and safety glasses. No exceptions.
Silicosis comes from silica dust released into the air. That pretty glass bit you’re planning to work is nearly 100% silica, and the blue color comes from metal oxides that are also majorly harmful.
It’s nasty and the damage is cumulative. I recommend a mask even if you’re working outdoors.
Related: Guide to Best Lapidary Equipment for Beginners
1. Backlight the Stone and Take a Look
The first thing we need to do is to make sure that we can polish the stone the way we wish to.
You’ll want a strong backlight for this. LED lamps work great, just make sure you can angle it in a direction it’s comfortable.
Glass always has bubbles. It’s the biggest giveaway that the “cool crystal” you bought from Wish is actually glass. Slag glass is no expectation, and these bubbles can screw up your plans.
You’re specifically looking for bubbles just underneath the surface. If you’re looking to get a homogenous look throughout the surface you’ll have to grind out any large bubbles you come across.
Once you know where the bubbles are, the rest of the process becomes much easier.
You should also look for any large internal fractures. If you accidentally grind into one of these then you may end up with a broken stone.
If you don’t mind the porous look on the surface the bubbles aren’t of any concern. You should still check for fractures.
2. Decide on Rough Shape
If you’re looking to change the shape of the stone as a whole, you’ll want to plan and mark it out.
Sharpies are awesome… for other uses. This stone is going to be wet and handled frequently, so they won’t do a good job.
You’re better off with a brass or aluminum scribe. If you have a scrap bit of rod for either metal you can easily create one just by filing the tip to a sharpened cone. They’re just pencil-shaped bits of metal, after all, nothing special about them.
Mark where you plan to grind and shape the stone.
You may not need to mark it depending on your plans. If that’s the case, you may still want to mark parts that have bubbles close to the surface to avoid cutting deeply in that spot.
3. Grinding and Shaping
Using your Dremel you’ll go through the rough grinding at this point.
Make sure your respirator and glasses are on. And make sure they stay on for the rest of the steps, we’re getting to the spots where you’re creating silica dust.
Get your water tray ready and dip the stone.
While it’s still wet, grind on the surface that you’re trying to shape. Dip it as soon as you see dust coming off the stone, while wet it will only throw mud but you’ll only get a small amount of grinding at a time.
Cordless Dremels or those with a flex shaft attachment can be used to carve under water. I don’t recommend doing this with a standard, corded tool since you’re risking an electric shock. Carving underwater saves time.
In addition to the lower dust emissions, water is also essential for protecting the stone. Glass is prone to heat fractures, and water will keep the surface cool for the most part. If the stone starts feeling hot to the touch, then set it aside and let it cool down.
If you dip a very hot piece of the slag into water it may crack or shatter. “Warm” is fine, “burning hot” means you need to wait while it cools in air.
With a grinding wheel, you’ll have even less time between dips. Some sort of drip system is recommended, but you need to have a grinder that can stand the water exposure. Not all of them can, and it’s another reason I recommend a rotary tool over a grinder.
Keep going until you’ve achieved your rough shape. At this point you can perform any carving that you want, there’s not going to be much shaping possible after this point without almost starting over.
Make sure you’re happy with the shape before you move on to sanding.
4. Sanding the Blue Slag
Sanding stone or glass is always a bit tedious. Even better, you may not be able to find high-grit sanding drums for your rotary.
The good news is that your hands aren’t powered by electricity, so it’s perfectly safe to do any hand sanding in a water bucket. I recommend it, your paper will last longer and the work will go more quickly.
If you have large, flat sections then you may want to tape the sandpaper to a flat surface. Tempered glass is ideal, but anything flat and smooth will work. You can pick up a tile from Home Depot for less than a dollar if you don’t have anything around the house.
I always start off from grinding with 220 grit. With 220 you can still make minor changes to the shape of the stone without it taking an excessive amount of time.
Between grits, the stone should have a uniform surface. The next grit will take out the scratches from the previous grit, and they’ll be undetectable after around the 600 grit mark. You should inspect the surface for any deeper than normal scratches and make sure they’re sanded out before you move on.
Nothing is as “fun” as having to drop back a few grits due to deeper gouges. Just do it right the first time.
I hand-sand up to 2500 grit at least, preferring to go higher when possible. Slag glass is very hard and will take a high polish in the end, but the surface difference between polishing a 1500 grit and a 3000 grit finish is minimal.
This will take a long time, so be prepared to set aside an afternoon.
Once you have a uniform shine with your highest grit, it’s time to break out the polishing gear.
5. Polishing
Polishing is simple with a rotary tool or felt wheel on a grinder.
You can “charge” wheels with your cerium oxide by either working some of the powder into the surface of the wheel/bit or by running a rotary bit slowly in the powder itself. Don’t do the latter if you don’t have variable speed controls, even the “low” setting on a cheap two-speed Dremel will just throw it all over the place.
You won’t be using water this time so watch the heat.
Work the surface of the stone carefully, not applying much pressure. With a cloth polishing wheel on a grinder, you need to focus on keeping the stone in hand, if it snags it can throw your blue slag directly into the ground.
At the finish, your surface should appear wet.
When you’re satisfied with the finish… well, it’s time to enjoy the piece!
Working a piece of blue slag can take a long time and requires a lot of hard work. But 10 out of 10 stone cutters agree that it’s well worth the effort!
- Online rock and mineral club for collectors of all levels!
- Find community with like-minded rock and mineral enthusiasts.
- Monthly Giveaways!
- Free Access to Entire Digital Library of Products (current and future products)*
