Casting in silver isn’t the easiest task in the world. What at first seems like the easiest task in the world quickly becomes complicated, and even knowing which kind of mold you need is the beginning of a lot of research. So, let’s take some time and talk about how to make the different types of mold and what their limitations are.
Without further ado, let’s get into it and discuss exactly how you make silver casting molds.
A Quick Word About Mold Types
Casting is a little bit more complicated than just pouring molten metal into a mold and hoping for the best. Even the best mold still requires technique and some types will require further equipment as well.
In general, if you’re trying to cast with as little equipment as possible you’ll want to go with sand casting or cuttlefish bone casting. Lost wax casting requires some serious equipment.
I’ll be focusing on just the molds here, rather than going into detail about the pour and handling the piece afterward. That said, the process of pouring can feel a bit odd to people new to silver. The following tips will help you be successful:
- Keep the torch on the silver until it becomes waterlike. Surface tension breaks down a bit at higher temperatures and this is where you want your silver to be when you pour.
- If using a torch, you need to keep the flame on the silver and the crucible’s spout during the pour.
- Pour swiftly. A slow, measured pour is often what newbies try to use… and it’ll cause problems. Pour the metal as quickly as you can while maintaining control of the torch and crucible.
Those should help you get in the right area. Lost wax casting usually requires a kiln at the very least, and to get a really good pour you’ll need a vacuum chamber as well. They’re a bit beyond the scope of this article, and outside of the scope of many workshops.
All hope isn’t lost on that end, many silversmiths send out their wax carvings to be cast in someone else’s shop. It’s not a bad idea, lost wax casting is a serious investment.
Sand Casting Molds
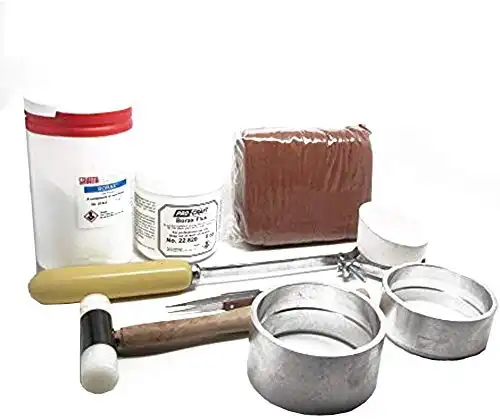
Sand casting is very basic, but it allows you to quickly make complex objects in solid silver. You’ll need some kind of mold and clay or sand setup to begin.
There are kits available that will give you everything you need to pull it off. You can also purchase casting sand or clay and then make a mold. My first ever sand casting was a brass ornament in a frame made from scrap wood.
The process is simple, but the also has limitations.
The biggest limitation with sand casting is that you won’t be able to cast objects with undercuts. Undercutting, when talking about molds, is just any piece that will prevent clean removal from the mold, the design should slope outwards from the center.
You can cast undercut parts in sand, but it’s a serious chore and requires a lot of fine-tuning. In the beginning, it’s best to just cast without undercuts, if you seriously need them on the piece you can cut them out with a flex shaft after the initial cast.
Your model is the beginning. Wood is the best way to go, in my opinion, but you can also use a 3D printer to print a model in hard plastic. Either way, the model will be reusable. Wood just happens to be the easiest, quickest thing to shape in most cases.
Open face casting is very simple: press the model into one-half of the prepared mold. After that, simply pour molten metal into the depression, and you’ll be left with a single-sided piece of metal in the shape of your mold.
Models are often made in two parts to make things easier when setting up the mold.
For those who’ve never cast, it would seem simple enough to just press in the parts and make a sprue leading down to it from the mouth of the flask. The reality is that if you try that you’ll end up with a mess of metal that bears little to no resemblance to what you’re going for.
Instead, you have to approach the mold as a puzzle.
The essential bits are the sprue, runner, and core. The core is the spot where your model has left empty space in the sand.
Constructing the core is easiest with a two-piece model. Prep the sand and flask as the instructions ask, then press the mold over the top half of the model. You’ll then repeat this process for the bottom half.
Respectively, the top and bottom of your molds are referred to as the cope and drag.
The core isn’t your entire mold, it’s just the beginning.
I usually use a ¼” dowel for pressing space for the sprue and riser. You can use whatever is handy.
The sprue needs to connect with the core of the piece. You should also widen a funnel out at the top of the sprue to make pouring the metal in easier. A depth of one inch and a width of 1” to 1 ½” at the top is sufficient for most purposes.
Often you may need to make a secondary channel to run to the core. This is called a gate and usually runs at a 90° angle to the sprue.
Now, there’s going to be air in the mold when you’re pouring. Metal will heat the air, causing it to rise and the metal at the funnel to gurgle. It’s… not great and it’ll cause problems with the final cast.
Instead, we make a secondary channel after the core called a riser. The riser allows an escape for air and will take in any overpour that happens when you’re working on your piece.
See the following diagram for a quick guide.
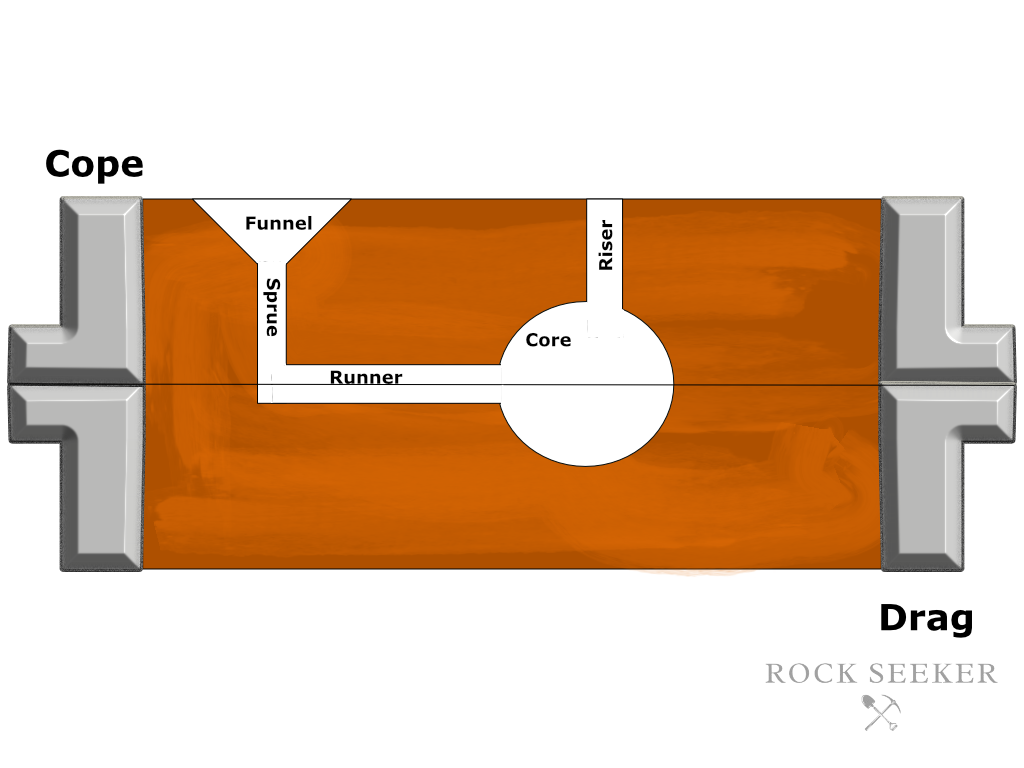
This is only one possible solution to the problems you’ll face. People with more experience often experiment with their pours trying to get a better end result. The above will work for the majority of situations, and you can always re-melt and pour again if there are problems.
Sand Casting Pros and Cons
Sand casting is easy, quick, and has some problems that make it unsuitable for some purposes.
The advantages:
- Quick to set up
- Re-usable model
- The simplest form of casting
Sand casting is most easily accessible. There are also some interesting applications being done with complex, 3D printed parts but they’re not relevant to silversmithing use.
The disadvantages can be a pain but aren’t a deal-breaker:
- Porosity is guaranteed in the final cast
- Poor surface finish
- Defects are common
While the above disadvantages can be a pain, this is still the simplest form of casting and it works very well for organic shapes.
Cuttlefish Bone Casting
Another simple, and a bit primitive, method of making a mold is using cuttlefish bone. All you’ll need is the bone, some sandpaper, and some kind of binding wire. Stainless steel is best, but copper will work.
You’ll also want a bit of scrap brass or copper sheet cut into strips. 18-20 gauge is ideal.
Cuttlefish bones may sound like an exotic material, but they’re used as a calcium supplement for birds. Any local pet store will have them and you can find them for cheap online as well. Try to find larger ones so you have plenty of room to work.
Your model should be ~10% larger than the desired final size. Cuttlefish casting is terrible for dimensional accuracy, but the rule of thumb for size loss during the cooling process is about 10%.
Take your bone and chop it into three pieces. A hacksaw works fine for this task.
Now, you’ll need to sand or file the surface of each piece of bone flat so they can sit against each other. They need to sit as flush as possible. Sand the bottom of two of the pieces as well, so they can sit flush. Wear a mask and work over a trash can, this generates a lot of dust.
Take your bits of copper or brass and bend them at right angles. They can be quite small, we’re just going to use them to lock the mold together.
Press them into one side of the bone along with the model and then press the model into the side of the bone with the metal.
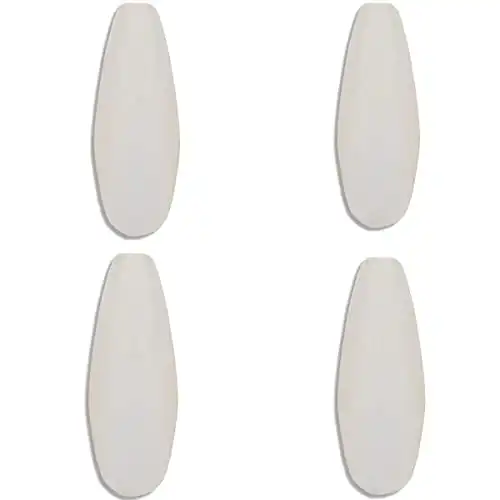
Press the bones together carefully but firmly. The bone will compact itself and create the void needed for the metal to be poured into. Then pull them apart and carefully remove the model. Cuttlefish bone is rather brittle so do this carefully.
With cuttlefish, we simply use a very wide funnel, rather than running a riser.
All said and done, you should have something that looks like the following diagram:

Cuttlefish casting can be quite complex, which is why I recommend learning to make the “keys” first. You can use another piece of bone, for instance, if you want to attain an extra dimension. As long as everything lines up, you’ll be good to go.
Cuttlefish Bone Pros and Cons
The nice thing about cuttlefish casting is that it’s quick, easy, and can create complex 3D shapes. Like sand casting, however, it has some serious drawbacks.
First off, the good parts:
- Cheapest casting method to setup
- Versatile when it comes to possible shapes
- Very simple gating process
Now, the disadvantages:
- Limited by the size of your cuttlefish bone
- 100% destructive of the mold
- Poor quality finish
- Requires extra care during the pour
These disadvantages mostly require that you do a bit more work after the casting process. The surface of most cuttlefish castings will be pretty rough, and you have to account for shrinkage during cooling as well.
That said, cuttlefish casting is accessible and easily done at home which makes it attractive for new silversmiths.
Lost Wax Casting Molds
Lost wax casting is undoubtedly the best when it comes to accuracy, finish, and… well, everything but the time and material investment to get it done at home.
Lost wax casting is way more complex than it looks at first glance. Make sure you do some extra research before you attempt it, but for the actual casting you’re going to need a burnout kiln or furnace and a vacuum chamber.
For making the mold, we just need a wax model attached to a sprue. There are also some polymers usable in 3D printers that will burn out at a proper temperature. The sprue needs to be wide.
This casting method is… a pain in the butt. For this reason, people often build large sprue trees to cast many pieces at the same time.
You’ll need some sort of investment plaster as well. This is what makes up the mold.

In essence, you make the entire gating system, sprues, funnels, and everything else out of wax. There are a ton of tricks to this kind of casting, but a basic setup is often enough.
The following shows a simple tree with four rings attached to a wax gating system:
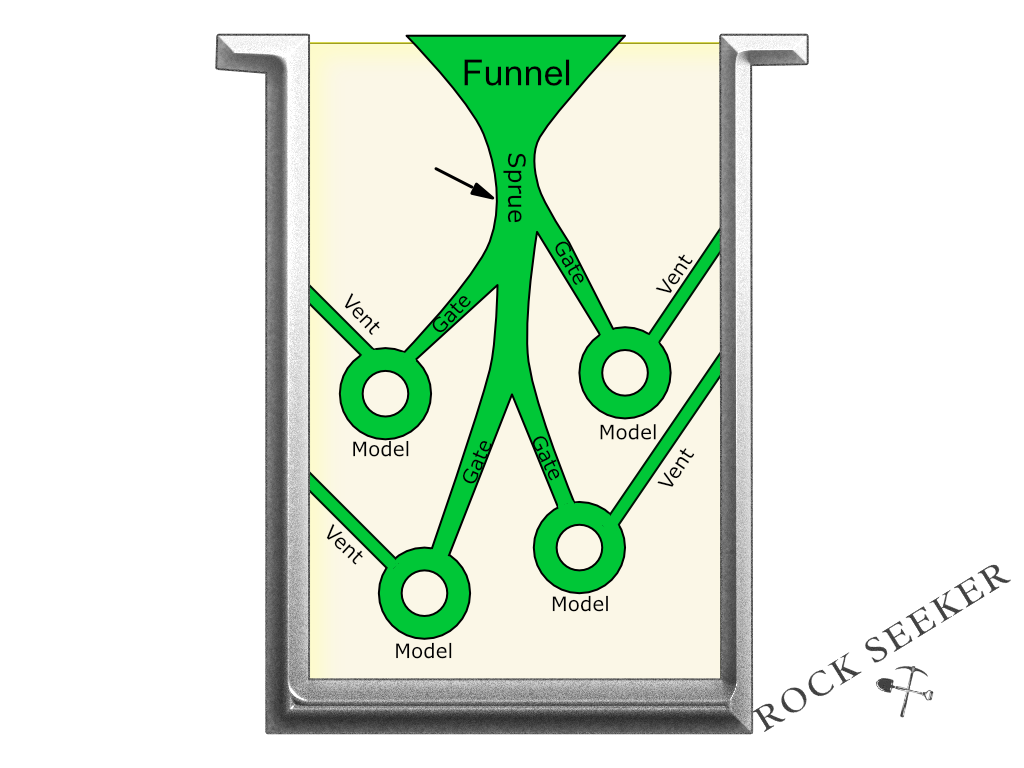
For larger objects, multiple channels are often used for the metal to pour into the casting. Just make sure that the channels can be fed by gravity.
Lost wax casting is difficult and equipment intensive. Experimentation is going to be needed, and if you’re learning at home I suggest using bronze a few times to get used to the process.
After creating your system, you’ll want to place it into wet investment plaster placed in a casting flask. Mix the plaster together, it’s generally 2:1 plaster to water by volume but check your brand.
Plaster takes anywhere from 16-48 hours to set.
Then it’s just a matter of allowing it to dry. Once dry, the mold is ready to be placed in a burnout kiln to melt the wax out of the mold. That leaves it ready for the pour.
Lost Wax Casting Pros and Cons
Lost wax casting is the ideal method for jewelry. It creates a final casting with the following properties:
- Less porosity than other methods
- Better surface finish
- Better details
- Great for keeping the same size
It just provides the best possible final product, at least as far as jewelry is concerned. It’s the method of choice for anything with a lot of detail in the art world, from life-size sculptures to fine jewelry rings.
Don’t underestimate the power of the silver coming out true to size either. Dimensional properties are very important for stone setting and lost wax is often used to design rings for a specific stone.
The disadvantages?
- Requires more expensive equipment
- Takes longer to complete
- Mold can only be used once
The latter is a big point: the wax placed in the plaster and the plaster mold itself are both one-shot items. Once they’ve been used, they’re done.
However, you can also make silicone molds for wax injection, or have someone make them for you. Silicone molds require a bit more expense and equipment but think of them as a backup for extremely detailed pieces.
Lost wax casting is a long journey, but it’s hands-down the best way to cast the majority of jewelry. For those who rarely perform it, however, it may be better to send off wax models to a professional. I can assure you the first few attempts won’t be pretty.
- Online rock and mineral club for collectors of all levels!
- Find community with like-minded rock and mineral enthusiasts.
- Monthly Giveaways!
- Free Access to Entire Digital Library of Products (current and future products)*
