How To Stabilize Turquoise
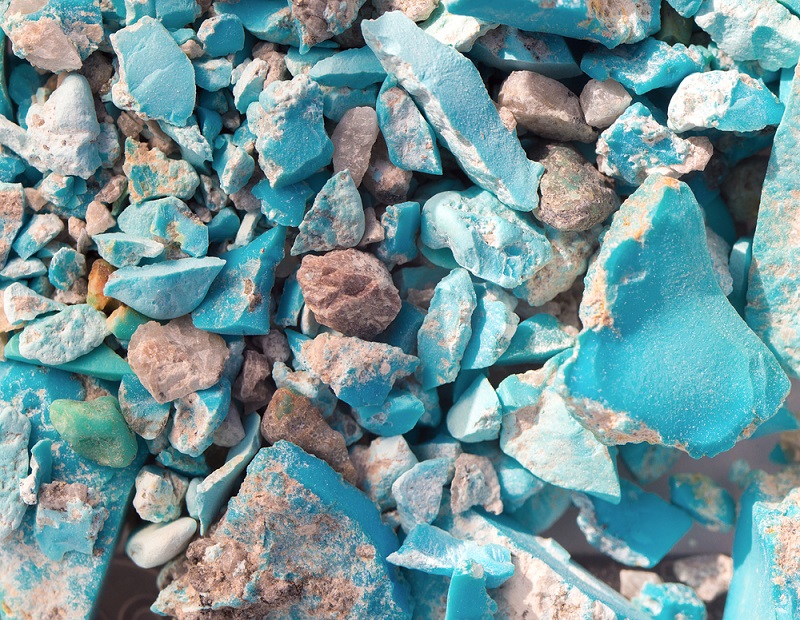
Those new to cutting turquoise are often disappointed with the results, at least initially. Turquoise is a valuable, expensive material and the price point of high-quality rough often turns off new lapidaries. Fortunately, turquoise can be stabilized, allowing you to create gem-quality material from lower-grade stock.
It’s not a complicated process, if you have some room and a bit of time to learn you’re in luck. Let’s learn how to stabilize turquoise!
What is the Difference Between Natural and Stabilized Turquoise?
Stabilized material is often thought of as “fake.” Something on par with the quality of the “azurite-malachite” you sometimes find from overseas vendors, which is really just crushed bits of stone set in resin.
Turquoise is an expensive material, so there are a lot of people who try to fake it. Whether it’s dyed howlite or entirely synthetic… there’s someone out there trying to mimic each type of turquoise enough to fool newbies. Often you’ll buy from overseas and have no recourse once the fake arrives.
Related: How To Tell If Turquoise Is Real Or Fake
Stabilized turquoise is not fake. It’s an accepted practice in the jewelry trade. People new to gemstone collecting often have to find out the hard way what is, and isn’t, acceptable when it comes to labeling.
So I’ll be clear: stabilized turquoise is accepted, but the process must be disclosed. It’s not on the sketchy end of things like dyed agate, but it’s not at the “totally acceptable” level like irradiated blue topaz.
Turquoise is rarely homogenous. The stone varies in hardness within the same piece, matrix inclusions can make it crumbly, or the crystals may just not have formed very well. It also tends to be porous.
Stabilization allows this material to be put to use, instead of being discarded.
Stabilized turquoise is created by using a resin to fill in the pores and create a uniform hardness. Natural turquoise can be just as hard and stable, but the majority of pieces simply don’t make the cut.
There are a few other enhancement methods used on turquoise, but stabilization is the preferred route. When you get into things like dyes or reconstituted turquoise (essentially epoxy and turquoise dust) you’re no longer working with expensive material.
Stabilization maintains a lot of value, most other methods do not.
I recommend stabilizing most rough turquoise. The upper 2-3% of turquoise may not need it, but the truth is that the overwhelming majority of turquoise available is stabilized.
If you have the good stuff, there’s no need but the majority of publicly available turquoise is a bit under par. Forming relationships with good merchants is essential if you’re planning on cutting it often. The good ones will be upfront about quality.
But enough about the differences, let’s talk about the process!
What You Need
The method I’m about to describe is not the newest or most effective method.
But unless you have a pressurized, heated chamber laying around your workshop it will have to do. Forced impregnation is newer and requires a lot more equipment and know-how.
Practice with your least favorite pieces. The process is easy to describe, but it will take some experience to master.
As always, first up is your PPE:
- Safety Goggles- You’ll be working with chemicals, and you don’t want to get splashed in the eye. For chemistry work safety glasses aren’t sufficient, you need a set of goggles.
- Latex or Nitrile Gloves- No need to expose your hands to anything dangerous.
- Respirator- A chemical fumes respirator is a good idea, especially if you’re working indoors. We’ll be using acetone and epoxy, both of which are carcinogens and can be dangerous in high concentrations. Assess your risk and err on the side of caution.
Once you’ve got yourself nice and protected, we’ll be using the following for this process:
- Acetone- Available at hardware stores. If you use a nail polish remover, it must be 100% acetone and contain no additives. You’ll want at least a pint (~500mL).
- 330 Epoxy- Use a 330 epoxy. There are lapidary specialty brands out there, but the main thing you need to do is look for high clarity when comparing brands.
- Dish Soap- Dawn works very well, but any degreasing dish soap is acceptable.
- Toothbrush- Or any small brush you have around.
- Stirring Stick- I use fir dowels I keep in my workshop for various uses. The stirring stick shouldn’t be made of plastic, or it may cause problems.
- Large Mason Jar- Or any other glass/ceramic container that seals. Make sure there’s no plastic in the seal, acetone fumes can melt some types.
1. Clean Your Turquoise
You’ll want to clean the stone thoroughly before you begin.
There are two things you need to accomplish: the surface of the stone should be free of debris, and you need to remove any oils that have seeped in. Cleaning is the variable I’ve seen messed up the most, this isn’t just “wipe the stone down”, it’s serious business for those who want a professional finish.
The problem is that turquoise is both chemically and physically a bit unstable. You’ll need to be careful about cleaning it, so we go to the good old standby: dish soap.
Make a warm-to-hot bath in a bucket with a good bit of dish soap. Place the stones in the mixture and scrub them with a toothbrush until the entire surface is clean. Let them sit in the soapy water overnight, then scrub again in the morning before removing them.
Place the stones somewhere out of the way and allow them to dry for 24-48 hours.
2. Make Your Stabilizing Mixture
The mixture we’re about to make is cool stuff: you can use it to stabilize almost any stone and you’ll be able to keep it around for future use.
Get your gloves and goggles on and grab your container.
The container must be non-reactive. Glass is the best, ceramic a close second. Metals and plastics are all reactive to some degree, and may or may not cause serious problems.
Pour a pint of acetone into your container.
You’ll then take both tubes of epoxy and empty them into the acetone. I use 1oz (~30mL) of 330 epoxy per pint (~500mL) of acetone. You can experiment with ratios, but the important part is to make sure that it’s all dissolved.
This can involve a lot of stirring, depending on the ambient temperature. Grab your stir stick and get at it as soon as the epoxy is in the acetone.
Don’t heat the acetone to make it dissolve faster. Unless you have chemical experience, heating up a flammable, volatile solvent isn’t going to end well.
3. Put the Stones In and Wait
Now you can just pop your stones in.
I usually stabilize preforms if the material is solid enough to run on a slab saw. Slabs ¼” or less are the best for this process, but I’ve seen it done up to ⅛” with good results. Finished cabochons are fine to place in as well.
You can stabilize the rough, but you may need to double the amount of time that the stones are placed in the solution. I recommend looking into a pressure solution for forced impregnation if that’s your plan.
We do have a safety issue here: acetone is very flammable. Store the jar outside of your home and somewhere dark and cool to avoid any problems.
You need to allow the rock to soak for at least three days. 3-5 is better, and 7-10 may be necessary for larger pieces of stone.
4. Dry the Turquoise
After enough time has passed, grab a pair of tongs or tweezers that you don’t care about. Use them to fish out your bits of stone.
Wear gloves when you do this. Unless you enjoy picking epoxy off your hands and everything you touch.
You need a surface that you don’t mind getting dirty. I keep a thrift store baking pan in my workshop for this purpose. Metal or glass will keep the stones from sticking too much.
Don’t place newspaper under the stones. It can be tempting to “save” a surface but you’ll have a headache from trying to pick bits of paper out of the epoxy.
The stones should be allowed to dry for a week before you use them for anything else. Place them in a dark, cool place for the best results.
After they’ve dried out completely, you’re free to use them for your intended purpose!
5. Save or Dispose of Epoxy Mixture
The epoxy mixture that you’ve just created will be good for a few more stones. If you plan on working with crumbly material like turquoise, chrysocolla, or azurite then you may want to save the jar.
The jar should be placed somewhere out of the way where it’s dark and doesn’t get hot. The solution will usually be good for another 2-3 runs in my experience.
Of course, keeping a jar full of acetone around is a bit sketchy and you may want to dispose of it.
The acetone/epoxy mixture is HAZMAT.
You cannot pour it down the sink, dump the jar in the trash, or otherwise just toss it. You’ll have to pay to dispose of it while it’s still wet. You’ll have to dry it out first if you don’t want to pay disposal fees.
My preferred method of disposal is to pick up a cheap glass or ceramic dish from a thrift store. Place the mixture outdoors and out of the sun. Acetone is very volatile and it’ll evaporate quickly even in the shade.
The epoxy may take a bit of time to harden in the bottom, but after 2-3 days the mixture is safe and legal to get rid of.
- Online rock and mineral club for collectors of all levels!
- Find community with like-minded rock and mineral enthusiasts.
- Monthly Giveaways!
- Free Access to Entire Digital Library of Products (current and future products)*
