Keokuk Geodes are famous among rockhounds. They’re dramatic and contain a wide variety of different minerals. They’re well established in the stone trade, and a great collector’s item, but some newbies aren’t sure where to start.
Let’s dig in, we’ll teach you what these geodes are, where to find them, and give you some tips to make things easier in the field!
What Are Keokuk Geodes?
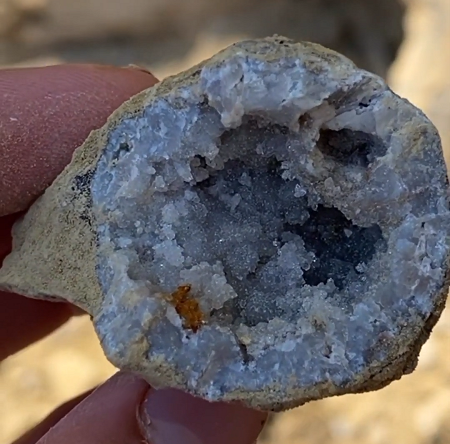
Keokuk geodes are round mineral deposits from Keokuk, Iowa. The majority of them are comprised of different varieties of white quartz and chalcedony.
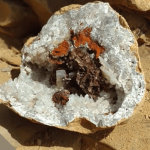
The magic of Keokuk Geodes, for collectors, mostly comes from the secondary and rarer crystal formations found in the region. The second most common mineral found in these geodes is calcite, which usually occurs in an iridescent brown form.
While they may not be the most visually dramatic stone around, Keokuk geodes are a fascinating study in mineral formation. Books have been written about them and even unique crystal forms discovered in their interiors.
Keokuk geodes hail primarily from the Lower Warsaw Formation, which is a shale layer that’s preserved many fossils in Iowa.
The geodes themselves range from an inch across to the size of a large pumpkin, with most being somewhere from 2” to 5”.
What Minerals Can Be in a Keokuk Geode?
The predominant minerals found in a Keokuk Geode are usually quartz and chalcedony. There are documented instances of over a dozen different minerals contained in Keokuk Geodes.
Some of these formations are very minor, rare, or even microscopic. Keokuk Geodes probably arent your thing if you’re really into pretty rocks, but for the budding geologist, they offer a glimpse into the history of stones older than mankind. It’s easy to feel humbled when you know what you’re looking at.
Among the minerals found included in Keokuk Geodes are the following:
- Calcite- Calcite often occurs in a brown-to-black coloration in Keokuk geodes, often with an iridescent surface. Other colors exist, ranging from light red to yellow.
- Pyrite- Often occurs as small patches of gold-colored crystals on the interior of the geode.
- Marcasite- Marcasite can be hard to distinguish from pyrite but it’s usually a more silver color. Marcasite can be determined from pyrite by antenna-like protrusions on the crystals. It also forms longer, thinner crystals than pyrite.
- Malachite- Forms as small patches of green material on the interior of the geode.
- Selenite- Usually seen as small, thin crystals jutting into the interior of the geode. Selenite is also known as gypsum.
- Aragonite- Small sprays of tiny, needle-like crystals. Often found in geodes alongside ferrous dolomite which forms as an orange crust.
Other minerals can be found as well, but the above are some of the most sought-after by collectors. If you’ve got some you’d like to identify, try running them down this list.
Keokuk Geodes can also contain both water and bitumen depending on the location.
They’re just little pockets of geological history! The more you know of them, the more impressive some of these formations seem.
Where Can I Find Keokuk Geodes?
Keokuk Geodes are specifically from the area around Keokuk, Iowa.
So the question for the would-be collector is where to go to find them.
Stream beds in the area are the main source, but you need to have permission to use the land. If you’re interested in hunting there’s a directory of places where you can make appointments for a paid dig.
Field Hunting Tips for Keokuk Geodes
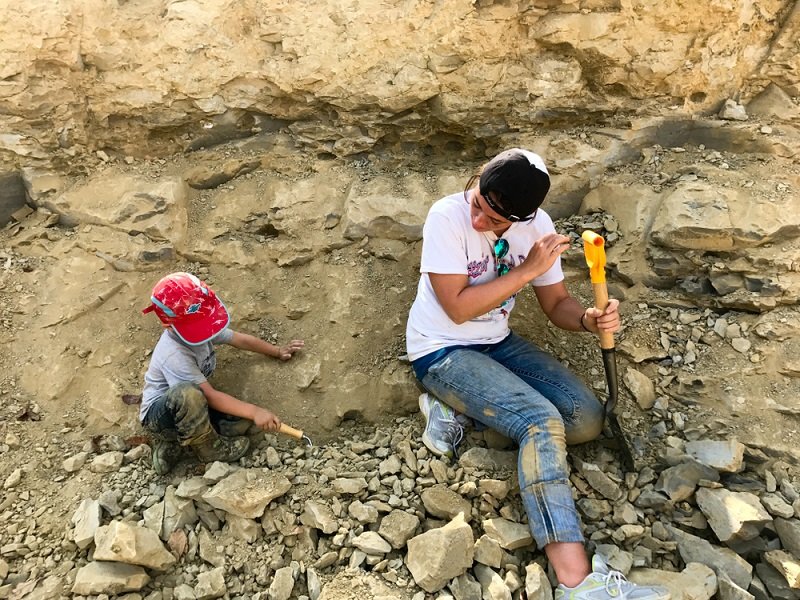
Keokuk Geodes come in varied environments across the area. Each area will mine a little bit differently, but for the most part you should be prepared to dig into some stone and break geodes in the field.
Finding the Right Equipment
Make sure you have everything you need when you head out.
I recommend the following:
- Rock Pick- For breaking smaller bits of stone and prying geodes out of the host rock. They can also be used in a pinch to crack geodes, but it’s not an ideal method.
- Pick Axe- Most areas will require breaking into stone, so an actual pickaxe is a must. It will make the job much faster.
- Shovel- An entrenching tool or other folding camp shovel works in most cases, but for large amounts of material you’ll want a standard shovel for the extra leverage it’s handle provides.
- Sledge Hammer- A 3-pounder is about right most of the time, use it to drive the chisels when you need to and for general smashing applications when applicable.
- Chisels- Needed to liberate the geodes from their host rock without destroying the specimen. Also used in cracking geodes if you don’t have a chain cutter.
- Safety Glasses- ANSI-rated, goggles are preferable. These are very important, stone breaks in unpredictable and dramatic ways when struck.
- 5 Gallon Buckets- The best sign of a serious rockhound anywhere. Heavy-duty buckets make transporting geodes a lot easier, and in most dig sites you’ll be leaving with a non-trivial amount of stone.
- Soil Pipe Cutter(Optional)- A specialized tool that uses a chain to cut pipes. It can also break open geodes in the field and most are good for stones up to about 10” in diameter. Larger splitters may be prohibitively expensive.
- Mason Jar(Optional)- If you’re in an area with bituminous or enhydro geodes, you may want to bring along a few extra containers for liquids. In the right hands, a lot of data can be gleaned from the water or oil contained in the geodes.
You should also bring sturdy work clothes and enough water and food for the day. Digging up geodes is usually an all-day affair, so don’t get caught flat-footed.

Locating Your Keokuk Geodes in the Field
You have two main options when it comes to finding Keokuk Geodes in the wild.
The first is to go through riverbeds. They’re hot spots for stones everywhere. Water erosion causes harder minerals to tumble instead of being broken down. The exterior of the geodes fit the bill.
Dry riverbeds are often the best spot. You should be looking for areas where the previous flow of the stream or river caused a lot of stone to pile up. You’ll recognize it easily enough: there’ll be a lot of denser stones there.
Going through these piles will often yield geodes. Systematically pick a spot and dig into the stones, separating any spheroid stones that might be geodes from the rest. You can crack them afterward to see inside.
If you spread out your search enough you can dig down a substantial amount and keep finding specimens.
It’s good practice to refill an area you opened up when you’re done if the area isn’t used for mining commercially.
In other places, you’ll be able to access the Lower Warsaw Formation specifically. The stone layer is largely comprised of sedimentary stone that’s easy to break into. Geodes will be fairly obvious: they’ll be nodules inside the host.
Using your pick break out the stone around them. You can use chisels to create spots for pry bars to fit in and expedite the process as well. Just try not to hit them directly, or you risk spoiling a good one.
At paid dig sites try talking to staff. They’ll know the area better than anyone else, and Keokuk Geodes occur in a lot of different localities. The geode types are usually specific to one location, so a dedicated hunter is going to be going on a lot of new adventures!
Field-cracking Keokuk Geodes
Most of us crack our geodes in the field. It’s nice to see what’s inside before you bring it home and prepare the specimen after all.
There are two main ways to crack your geodes in the field.
The Chisel and Hammer Method
Take your chisel and create a scored line around the center of the geode.
You’ll want to make several passes to thin out the material as much as possible. When you’ve got a deep, scored line it’s time to break it open.
Don’t just try to crack it open with deep scoring.
Instead, use your chisel to get inside the geode and create a space large enough for your prybar. Use the prybar to crack it open.
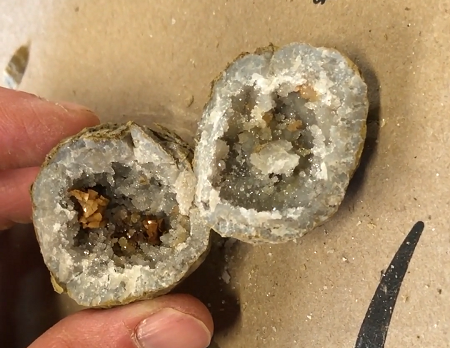
If you scored deeply enough, you’ll get a relatively clean split along the scored line.
Using a Soil Pipe Cutter
If you’re going to regularly be cracking open geodes, the sheer amount of work of the chisel method is daunting.
A soil pipe cutter is an expensive investment, but they’re one of the best ways to cleanly crack geodes without running a big slab saw. Look for a used one and you may only have to spend a couple of hundred dollars. Pawnshops are a good bet.
Using one is quite simple: you’ll place the chain around the geode and loop it tight through the front of the device. You’ll then press the lever on the device until the geode breaks.
Surprisingly, these often result in a very clean break and two equal halves of the geode in just a couple of minutes.
- Online rock and mineral club for collectors of all levels!
- Find community with like-minded rock and mineral enthusiasts.
- Monthly Giveaways!
- Free Access to Entire Digital Library of Products (current and future products)*
