If you’re like me, rockhounding is just another way to appreciate nature and the beauty surrounding us just outside our doors.
And starting a rockhounding journal is an exceptional way to document the journey, track the progression, and preserve the details and stories behind each specimen that might otherwise be lost to time.
The same holds true for both seasoned rockhounds and those just starting out, maintaining a journal greatly enhances the entire experience by recording your observations, methods, and the sentimental value of your finds.

Rockhounding is an extremely unique hobby which means choosing the right kind of journal that allows for the type of entries you’ll be making an important part of the journaling process.
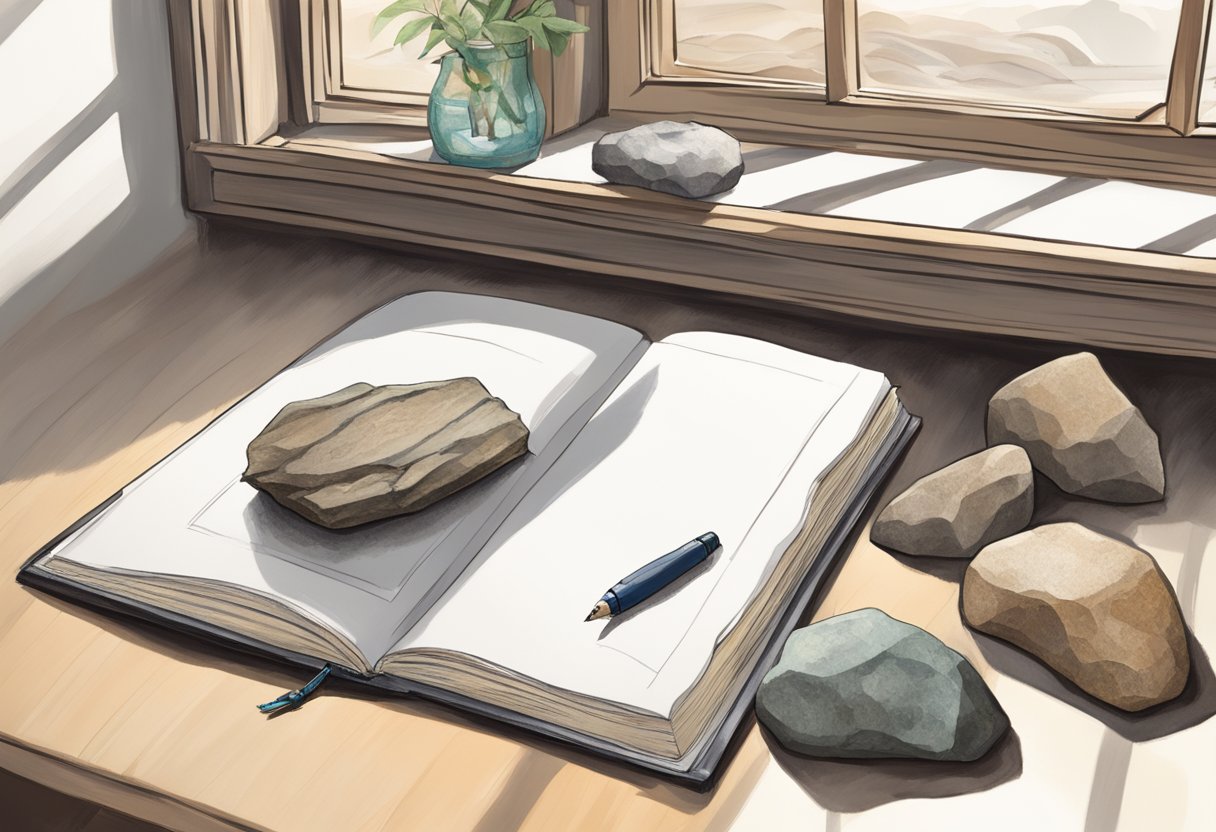
A journal is where all the information, details and memories of your outings will live. And once you’ve chosen the perfect journal, setting it up is the next exciting phase.
Here, you can get creative, establishing sections for different types of entries, like location details, geologic observations, sketches, and photographs of your finds. This customization makes the journal uniquely yours, tailored to how you experience rockhounding, whether in your own backyard or deep in the mountains somewhere.
For me, I’ve found that documenting my adventures allows me to recall information and details I would have otherwise forgotten about. Each entry is a snapshot in time, capturing the excitement of discovery and the knowledge gained.
Not only does this help me keep track of where and when I found each specimen, but it also encourages me to reflect on the sights, sounds, and emotions that accompanied those moments. Maintaining a rockhounding journal not only provides a record of my collection but also nurtures an ongoing narrative of my journey as a rockhound.
Choosing Your Journal
Selecting the right journal is pivotal to capturing your rockhounding adventures. It should be a reflection of your personal style and practical needs.
Types of Journals
Hardcover journals: Ideal for durability and can withstand rough handling in the field. My go-to choice for outdoor activities.
Spiral-bound notebooks: These allow me to lay the journal flat, making it super easy to sketch or jot down notes with one hand. These are good for at-home use and for cataloging and record keeping.
Size and Portability
I always consider how I’ll carry my journal. For long hikes, I prefer a:
- Pocket-sized (3.5 x 5.5 inches): Slips easily into my pack or pocket.
- Medium (5 x 8.3 inches): Strikes a balance between writing space and portability.
Paper Quality and Durability
The paper should be thick enough to prevent ink bleed-through, typically around:
- 80 GSM to 100 GSM: Best for pencil or ballpoint pen.
- 100 GSM or higher: Needed if I use markers or fountain pens.
Many journals designed specifically for rock and mineral enthusiasts are water-proof or water resistant. A very important factor to consider if it’s wet and rainy where you are.
Journal Setup

Setting up my rockhounding journal is pretty straightforward. But there are a few key entries you’ll want to make. I keep it organized and tailored to my needs, making it both a functional log and a personal keepsake. I’ve saved mine as a PDF so I can easily print off more pages as needed as I go.
Here’s a peak at how I set mine up.
Dating Entries
I always date my entries. Always. This chronological context helps me track the progression of my finds and experiences. Here’s a simple table I use to keep it structured:
| Date | Location | Rocks Found | Notes |
|---|---|---|---|
| MM/DD/YYYY | [Location Name] | [List of rocks/minerals] | [Observations] |
Recording Your Finds
While I’m out collecting, I tend to be fairly meticulous when it comes to journal entries. This helps me track my progress and recall details I might otherwise forget.
Factual Information
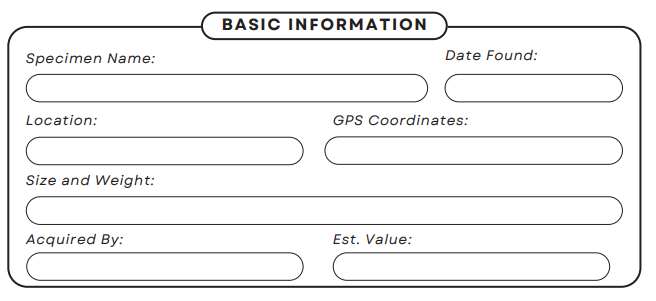
For every specimen I find, I jot down the basics right there in the field. Here’s what I focus on:
- Location: I use coordinates (latitude and longitude) whenever possible.
- Date and Time: The exact date and time of the find.
- Mineral Composition: The minerals I believe the specimen is made of.
- Size and Weight: Measurements to keep track of the specimen’s dimensions.
- Found By: Who found the specimen? Perhaps it was a collecting partner.
- Estimated Value: Knowing the value of a specimen can be important for insurance purposes and for understanding the market value of similar specimens.
This is what this part of my journal entry looks like:
Photographic Records
I always snap a couple of photos with my smartphone. One picture is a close-up to capture detail, and another includes a common object for scale, like a coin or a pen. Here’s how I organize them:
- Close-Up Photo: A focused image showing the specimen’s texture and any unique features.
- Scale Photo: A shot with a familiar-sized object to provide a sense of the specimen’s size.
I store the digital photos in folders named after the collection date and use a naming convention that matches my journal entries (e.g., “20240223-Quartz-Specimen1.jpg”).
Here’s a guide I put together that gives some really actionable tips for taking photos of rocks and minerals.
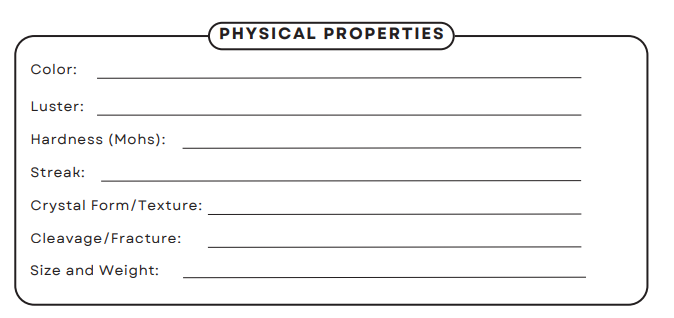
Physical Properties
I don’t usually fill this part of the journal out while out in the field. And I don’t always fill it out at home either on all my finds. But on my nicest, more valuable specimens I’ll usually fill this section out.
- Color: One of the most noticeable features, color helps in the initial identification
- and classification of the specimen.
- Luster: This property gives clues about the mineral’s composition and structure.
- Hardness (Mohs): Hardness is a key diagnostic property in mineral identification
- and provides insight into the specimen’s durability and potential uses.
- Streak: The color of the mineral’s streak often reveals the true color of the mineral, which is important for accurate identification.
- Crystal Form/Texture: This helps in identifying and classifying minerals, as certain minerals crystallize in specific forms.
- Cleavage/Fracture: Cleavage and fracture patterns can be diagnostic in identifying minerals and understanding their internal structure.
Here is what the Physical Properties section of my journal looks like:
Sample Labeling
After I get home, I like to label each specimen with an ID number which ties back to my journal. I’ve found this to be the easiest way of cataloging and organizing all the pieces of my collection. Here’s my labeling method:
- ID Tag: A small label (corner of my journal) with a unique specimen ID which corresponds with the page number in my journal.
- Protective Storage Container or Display: The specimen goes into a container, bag or display with the ID tag.
Here’s the format I use. You can see the ID tag in the bottom right corner:
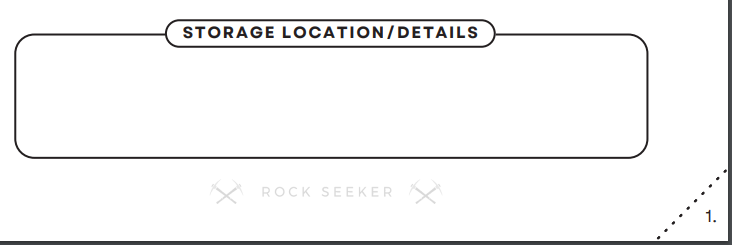
This system makes it super easy to cross-reference my journal entries with the physical specimens that are in storage containers or on display.
Reflecting on Experiences
Maintaining a rockhounding journal encourages me to contemplate my finds and the adventures that come with them. This contemplation often leads to a deeper appreciation of my experiences and a significantly better appreciation for the hobby as a whole.
Personal Thoughts, Notes and Observations
This is the section of your journal where details that are easily forgotten can be recorded. After reading a journal entry 10 years from now, you might be reminded of a trip you’ve completely forgotten about.
Personal observations and notes add context to your collection. They can include unique characteristics, personal experiences related to the specimen, or any alterations (like cutting or polishing) the specimen has undergone.
My Impressions: Every entry in my journal starts with my initial feelings about the location and the pieces I’ve found. I take a moment to jot down:
- Excitement level: Was I thrilled about the discoveries?
- Scenery impact: How did the environment affect my experience? The weather?
- Conversations/Experiences: Who were you with? What was their involvement in the find?
Reflecting like this helps me recall my adventures vividly, enjoy the trips all over again and really understand what aspects of rockhounding resonate with me the strongest.
Learning and Improvements
Skills and Strategies: As I review my past journal entries, I note any new skills I’ve picked up or techniques that could use some tweaking. Here’s a quick list:
- Identification skills: Have I gotten better at recognizing rock types?
- Tool handling: Am I using my equipment more efficiently?
Evaluating these points allows me to set clear goals for improvement and keep track of my progress over time.
Use My Rockhounding Journal and Catalog System
If you like the system that I use, I’ve made it available to you to use. Access a PDF of the same rockhounding journal and ID/Cataloging system that I use myself.
- 20 Detailed Journal Pages
- Unique Catalog Numbers
- Date, location, and acquisition details.
- Color, luster, hardness, and more.
- Space for Personal Observations and Storage Details
- Online rock and mineral club for collectors of all levels!
- Find community with like-minded rock and mineral enthusiasts.
- Monthly Giveaways!
- Free Access to Entire Digital Library of Products (annual memberships)
