Cutting cabochons is a huge part of the lapidary arts, but just about anyone can learn to do it. It just takes some time and attention to detail to cut your own excellent cabochons from whichever material you’ve got on hand. The question, then, is how to do it well.
If you’re ready to learn, let’s dive in and I’ll teach you just a bit about how to make cabochons from slab to cab.
Opening Disclaimer
I’ll specifically be talking about using a cab machine or another form of water-safe, vertically oriented grinder. Those who use a flat lap will also be able to use the instructions with just a little bit of modification. Namely, gravity becomes a bit of a factor when you’re working straight down, slanted flat laps are almost identical in use on the toher hand.
If you have limited tools, I recommend checking out our guide to using a Dremel for polishing which includes brief instructions on using a Dremel for grinding and shaping.
I’m also not going to go into slabbing the rough stone in this case, instructions will begin with trimming the slab to size before grinding operations begin.
I’m also not going to recommend any improvised options for a cab machine in this case. It’s possible to adapt a bench grinder for this task but there are a lot of pitfalls that can lead to unsafe conditions or injury.
If you’ve got a ton of experience with tools there’s nothing really special about lapidary equipment that will keep you from putting something together. If you don’t, you’re going to end up needlessly risking your safety for very little gain.
Because of the variance in builds, troubleshooting your machine is also beyond our scope here.
You can still cut a cabochon without a dedicated cab machine, it’s just quite a bit different than using the wheels. So we’ll just focus on the good stuff: helping you cut cabs with the right tools.
What You Need
You’ll need quite a few things to cut a cabochon, no lapidary workshop ever seems to have enough room.
You can acquire access to most of the basic equipment and some instruction with most rock and/or mineral clubs. You don’t necessarily need a Cab King of your own (yet…).
That said, we’ll be using the following pieces of major equipment to get the job done:
- Trim Saw/Wet Tile Saw- Wet tile saws work better for trimming than slabbing stones, but a dedicated trim saw is usually a better choice.
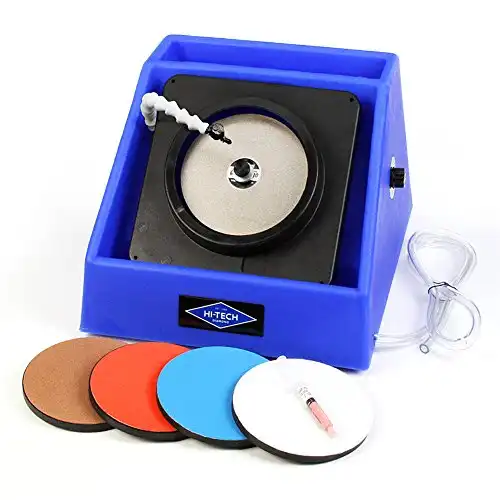
- Cab Machine- Something with multiple wheels is greatly preferred, but you can do this with smaller machines. You’ll also need the lubricant the machine is designed for which is usually water with a cab machine.
- Polishing Machine/Bench Grinder- For the final polish. If you’re using a bench grinder, make sure the wheels are balanced since putting a felt wheel on one side and leaving a heavy silica carbide wheel on the other will lead to problems.
- Dop Pot(Optional)- There are other options for smaller stones that need to be dopped, but a standard dop pot is still nice to have around.
You’ll also need the following pieces of PPE:
- Safety Glasses/Goggles- I prefer goggles for cutting cabochons, the lubricant tends to get everywhere and some stones (ie: malachite) are pretty nasty to get in your eyes. Goggles add a bit of extra protection over the standard glasses.
- Respirator or N95- Use a respirator for any dangerous minerals or when working indoors. Outdoors or with an open garage door an N95 is usually sufficient to protect you.
- Apron/Coveralls(Optional)- A canvas apron will save your clothes from a lot of dust. More importantly, it’ll save your lungs from future exposure as the small particles become airborne after being dried and touched.
- Gloves(Optional)- Gloves should be used only with a dop stick and toxic minerals on the wheel. Do not directly apply a stone to the wheel with gloves on. Rotational force and gloves don’t mix, make sure that there’s no chance of contact between the gloves and the wheels.
And finally, a few other things most of us don’t have around the house:
- Brass or Aluminum Scribe- I make mine by filing down brass or aluminum rod. Just use whichever is going to remain more visible during the cutting process depending on the color of your stone.
- 10x Loupe- For examining the stone for scratches in between grits.
- Dop Wax- Dop wax is ideal, you can also make your own. In my experience green dop wax is cheap and easy to find, it’s pretty rare that it’s more time and cost-effective to make your own wax.
- Preferred Polish- This depends on the stone and what’s already on your wheels. Diamond will cut anything, cerium oxide is a good all-purpose polish to keep around but it won’t work for beryl or corundum minerals.
- Microfiber Rag- Trust me on this one, there’s nothing better for clearing off dust in between grits so you can examine the surface better.
- Cabochon Template- These are remarkably useful, even if you don’t normally cut calibrated cabs. They’ll give you a good picture of the portion of the stone you’re planning on cutting.
So gather your things together, and we’ll get started.
How To Make a Cabochon
Step 1: Outline and Trim Your Slab
The first thing you’ll want to do is grab your scribe and trace out the design that you’re planning to cut. Working from a template is a good idea for a beginner, making it easy to trace the outline on the lapidary material and know exactly what portion of the stone you’ll be highlighting.
Learning to cut great-looking cabochons takes some time, you’ll eventually learn how some features are cut down and how to maximize the visual impact of a pattern while minimizing the amount of waste material.
For now, let’s just not worry about that. If this is actually your first cabochon I recommend going with an oval pattern. With no sharp corners, it’s ideal for beginners, and they’re also much easier to eyeball than perfectly round cabochons where small amounts of material can destroy the shape.
It can be ideal to trace out where you want cabochons to be cut on the entire piece of slab before you begin cutting the slab down.
You want to take long, straight angles with saw blade as much as possible. For instance, on an oval you’ll want to cut along the sides and top, then take that rectangular piece and make diagonal cuts on the corners. You can cut these down more or less depending on the exact curvature of the oval.
Once you have your preforms roughed out of the slab, we’ll begin finishing the shaping of the exterior.
Step 1a: Dop Your Stone(Optional)
If you’re cutting a smaller cabochon or just prefer to use a dop stick then you should prepare your preform for dopping before grinding.
The process is simple:
- Turn on the dop pot and drop in the recommended amount of dop wax.
- Set your stone on the metal rim of the dop pot’s bowl, which also heats during the process.
- Wait until the wax melts
- Pick up some wax on the dop stick and then it on the back side of your preform. The stone needs to be warm for this to work, otherwise, the wax will cool too quickly.
- Allow the wax to cool to room temperature, hardening the material
- Test the bond to make sure it won’t break.
You can simply dry and place your preforms on the edge of the bowl while you’re trimming other cabochons from your initial slab, or you can go find something to do for 20-30 minutes while waiting for the pot to heat.
Step 2: Grind Down Your Preform
Using the lowest grit wheel on your cab machine, you’ll now begin to grind down the edges of the preform until they meet your scribed lines.
Make sure to use large amounts of water during this portion if you can control your drip system. You want to avoid actually putting any dust into the air as much as possible.
Pay attention to the top of the stone. Grinding with a rough wheel (usually 80 or 120 grit) can cause chips to come out of some stones if you’re applying too much pressure. This happens most often with stones that don’t have a solid internal crystalline structure and are prone to conchoidal fractures like agate or obsidian.
With a dop stick, you can come in perpendicular to the grinding wheels and grind the material. Large cabochons have a tendency to tear off the dop stick during grinding, so you may want to grind them by hand before switching to a dop during doming and polishing.
You should have the complete shape of the stone cut at this point, barring very minor corrections to smooth out curves.
Inspect the stone and look for any major trips or protrusions.
With a 4 or 6-wheel machine you can step up to the next grit to smooth the girdle just a bit more, but it’s not worth replacing a wheel to do so on smaller machines.
Step 3: Doming the Cabochon
The dome of the cabochon is the most important part. It needs to be even, with a high point in the center of the stone, and at the right angle to display the depth of the stone.
You also need a girdle running around the exterior edge of the stone. The ground edges of the cabochon should be 100% even all around the stone, otherwise, it’ll be problematic to set it in a piece of jewelry.
You may also want to cut a 45-degree lower girdle on the bottom of the stone. This helps a bit with some forms of setting but isn’t really necessary.
Doming usually occurs somewhere between 220-grit and 600-grit, depending on the wheels available to you. I’m a big fan of 400-grit wheels and paper for just about everything and it’s what I usually used to do the first 80% or so of the doming before switching to a 600-grit wheel.
Your mileage may vary, at least one person reading this has already decided the above is completely wrong. The truth is that everyone develops their own preferences and you’ll be pretty set in your ways after a couple of hundred cabochons.
When using a wheel you’ll essentially come in at a few set stages of angles before creating the final dome over the surface of the stone.’
Determine your girdle height and mark it with the scribe. You can either create a continuous ring around the stone or you can mark it in four or five places with a dash. The ideal girdle height is abut 33% of the stone’s total height. It’s rarely that clean in practice but it’s what you should aim for.
Here’s how it works:
- Cut the bottom girdle first at a 45-degree angle around 10% of the stone’s height. This should be a pretty minor feature, don’t make it too tall or the cab will be unsteady in a setting.
- Cut the top of the stone all the way around at 10-15° angle and inspect to make sure the girdle height is even all the way around. You can skip this but cabochons with straight sides are a bit less desirable than those with a slight angle on the girdle.
- Mark ⅔ of the depth of the stone with your scribe. Use that line as a guide to creating a 45° grind all the way around the exterior of the stone above the girdle.
- Make a second 15-30° grind on the stone. This secondary grind should be centered on the upper edge of the 45° initial grind.
- Switch up a grit and smooth out the angles of the stone to create the dome. Use 400-600 grit for this to avoid further damage to the stone.
It will feel a bit weird at first, but after cutting a couple of them it’s second nature.
Step 4: Dry and Inspect the Stone
Pull the stone and dry off the water or oil lubricant used on the grinding wheels. You’ll want to inspect the dome, girdle, and bottom of the stone carefully.
You’re looking for any potential fractures that may show up and disturb the integrity of your sanding and polishing in a bit. Pitting and other deep surface problems will either need to be taken care of or ignored at this stage.
Using something like Opticon to fill in the cracks isn’t a bad idea if the stone has a lot of fractures and you want to continue. Stabilizing material before cutting is another option, especially for porous stones like turquoise.
The real goal here is to see if you’re satisfied with the dome and rough finish of the stone. If you aren’t then correct the problems before you continue.
Don’t just assume things like minor pits will grind out. Often there’s a reason the mineral is reacting oddly in that location and the problems will continue. You also shouldn’t just start grinding out problem areas without a plan.
No major alterations to the stone will be made at this point. The final form should be roughly there, and your plan (or lack thereof) to deal with any problem areas should be formed and dealt with before you continue.
Step 5: Sanding the Cabochon
At this stage, we’ll take the preform and begin working through the progressive wheels you have available to you.
In my case, I preferred to run 600, 800, and 1200 before deciding if the stone was worth hand sanding. In the latter case, continuing to 3000 grit before polishing was the normal protocol.
Not every stone needs a 3000-grit sanding job. Harder stones will do better with these ultra high-grit sandpapers or wheels but most softer stones can come right off a 1200 (or even 800) wheel and be ready to polish.
Sand smoothly and make sure to slow down if you see any dust come off the wheel. You should move in a consistent, even manner for the best results. You’ll want to grind out any small angles left from the pre-forming process but do your best to maintain an even dome.
After each grit, dry the stone off and examine it. Any deep scratches need to come out before going up in grit, and you may need to move back a wheel if you didn’t catch them the first time around.
Keep going until you’ve reached your final wheel and decide if it’s worth hand sanding. At 1200 grit the stone will be shiny but lack the “wet” look that shows off a super high polish.
Now we move on to polishing.
Step 6: Polishing the Cabochon
Polishing is a surprisingly heated topic. That’s because the final polish is what shows off your craftsmanship more than, perhaps, any other stage of this process. Most people can be taught to trim, pre-form, cut, and sand a cab in a weekend course.
It will take a lot longer to get the perfect polish down.
Polishing methods vary. My preferred working materials are agate and jasper, which are harder than many materials that people cut en cabochon. My method was pretty simple:
- Get the stone to 3000 grit after the last wheels.
- Mix cerium oxide with water on a small glass tile or plate.
- Turn the machine on and pick up the paste off the tile or plate with the wheel.
- Press the stone into the wheel to polish. Be mindful of heat, as it can cause dop materials to fail and may put the stone at risk of thermal shock. Either dip it in water regularly or back off when it starts to become uncomfortable to touch.
This worked for me for many years, but it’s a very basic outline and many people opt for more complex routines. I’ve seen people go through 3-4 stages of diamond paste or use varying compounds in multiple stages like pre-polish, polish, and super polish.
I recommend keeping it simple to start with and then asking other lapidaries whose work you admire about their polishing routines. Not everyone will give their “secret recipe” up, but the best way to learn is to try a variety of ways and figure out what works the best for you.
Lapidary groups on social media are one of the best places I’ve found to learn, people tend to be more guarded about their techniques in in-person settings.
The good news is that this is just the start of the journey. The above is the simplest, most direct way to cut a cabochon but there’s always more than one way to achieve an end.
Give it a shot first, but remember that there’s a vast universe of different stones, techniques, shapes, and polishes to try until you find your perfect fit!
- Online rock and mineral club for collectors of all levels!
- Find community with like-minded rock and mineral enthusiasts.
- Monthly Giveaways!
- Free Access to Entire Digital Library of Products (annual memberships)


